CentOS7 部署Zabbix5.0

什么是Zabbix ?
zabbix([`zæbiks])是一个基于WEB接口的提供分布式系统监视以及网络监视功能的企业级的开源解决方案。
zabbix能监视各种网络参数,保证服务器系统的安全运营;并提供灵活的通知机制以让系统管理员快速定位/解决存在的各种问题。
zabbix由2部分构成,zabbix server与可选组件zabbix agent。
zabbix server可以通过SNMP,zabbix agent,ping,埠监视等方法提供对远程服务器/网络状态的监视,数据收集等功能,它可以运行在Linux,Solaris,HP-UX,AIX,Free BSD,Open BSD,OS X等平台上。
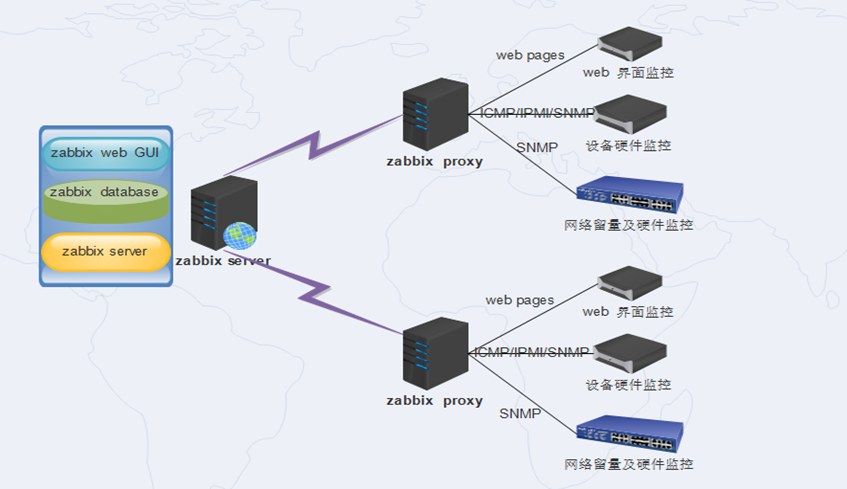
Zabbix 架构
ZabbixSever运行在LAMP或者LNMP环境上,可通过搭建Proxy,实现分布式建制,简单架构图如下
如何搭建?
安装好Linux(任意发行版均可,演示为CentOS 7.x,防火墙关闭或放行10050与10051端口,关闭SElinux
#修改计算机名为zabbix $ sudo hostnamectl set-hostname zabbix #查看系统版本 $ sudo cat /etc/redhat-release CentOS Linux release 7.4.1708 (Core) #修改网络配置 网卡编号以自己系统安装完成后显示为准,这边显示ens32 $ sudo vi /etc/sysconfig/network-scripts/ifcfg-ens32 TYPE=Ethernet PROXY_METHOD=none BROWSER_ONLY=no #BOOTPROTO=dhcp #直接在这改也可以,个人习惯问题,喜欢注释掉,另起写ip DEFROUTE=yes IPV4_FAILURE_FATAL=no IPV6INIT=yes IPV6_AUTOCONF=yes IPV6_DEFROUTE=yes IPV6_FAILURE_FATAL=no #IPV6_ADDR_GEN_MODE=stable-privacy #此行也注释掉 NAME=ens32 UUID=4f9c06a4-23a6-40a7-81d0-7c5010abb0ef DEVICE=ens32 #ONBOOT=no #注释掉 IPV6_PRIVACY=no BOOTPROTO=static #设置网卡静态IP模式 ONBOOT=yes #开机启动 IPADDR=172.16.252.100 #设置IP地址 NETMASK=255.255.255.0 #设置子网掩码 GATEWAY=172.16.252.2 #设置网关 DNS1=223.5.5.5 #设置DNS地址 #退出vi编辑模式,按esc,输入':wq!'保存退出 #重启网卡 $ sudo systemctl restart network #查看网卡IP配置是否成功 $ sudo ifconfig ens32 ens32: flags=4163mtu 1500 inet 172.16.252.100 netmask 255.255.255.0 broadcast 172.16.252.255 inet6 fe80::20c:29ff:fe13:39ff prefixlen 64 scopeid 0x20 ether 00:0c:29:13:39:ff txqueuelen 1000 (Ethernet) RX packets 290 bytes 28350 (27.6 KiB) RX errors 0 dropped 0 overruns 0 frame 0 TX packets 225 bytes 39888 (38.9 KiB) TX errors 0 dropped 0 overruns 0 carrier 0 collisions 0 $ sudo vi /etc/selinux/config #修改SElinux配置文件,永久关闭SElinux,重启生效 # This file controls the state of SELinux on the system. # SELINUX= can take one of these three values: # enforcing - SELinux security policy is enforced. # permissive - SELinux prints warnings instead of enforcing. # disabled - No SELinux policy is loaded. SELINUX=disabled #将此行enabled修改为disabled # SELINUXTYPE= can take one of three two values: # targeted - Targeted processes are protected, # minimum - Modification of targeted policy. Only selected processes are protected. # mls - Multi Level Security protection. SELINUXTYPE=targeted #验证SElinux是否成功关闭 $ sudo setenforce 0 #重启后验证SElinux已成功关闭 $ sudo setenforce 0 setenforce: SELinux is disabled #关闭防火墙 $ sudo systemctl stop firewalld #永久关闭防火墙,禁止开机启动 $ sudo systemctl disable firewalld Removed symlink /etc/systemd/system/multi-user.target.wants/firewalld.service. Removed symlink /etc/systemd/system/dbus-org.fedoraproject.FirewallD1.service. #查看防火墙状态(此处演示,生产环境视情况而定,不建议直接关掉) $ sudo systemctl status firewalld ● firewalld.service - firewalld - dynamic firewall daemon Loaded: loaded (/usr/lib/systemd/system/firewalld.service; disabled; vendor preset: enabled) Active: inactive (dead) Docs: man:firewalld(1) ... ...
安装环境准备
#安装zabbix下载源
$ sudo rpm -Uvh https://repo.zabbix.com/zabbix/5.0/rhel/7/x86_64/zabbix-release-5.0-1.el7.noarch.rpm
Retrieving https://repo.zabbix.com/zabbix/5.0/rhel/7/x86_64/zabbix-release-5.0-1.el7.noarch.rpm
warning: /var/tmp/rpm-tmp.OHAfBE: Header V4 RSA/SHA512 Signature, key ID a14fe591: NOKEY
Preparing...                          ################################# [100%]
Updating / installing...
 1:zabbix-release-5.0-1.el7         ################################# [100%]

#安装zabbix-server 与zabbix-agent
$ sudo yum install zabbix-server-mysql zabbix-agent
Loaded plugins: fastestmirror, langpacks
... ...
Installed:
zabbix-agent.x86_64 0:5.0.6-1.el7                zabbix-server-mysql.x86_64 0:5.0.6-1.el7
Dependency Installed:
OpenIPMI.x86_64 0:2.0.27-1.el7                         OpenIPMI-libs.x86_64 0:2.0.27-1.el7
OpenIPMI-modalias.x86_64 0:2.0.27-1.el7                fping.x86_64 0:3.10-1.el7
unixODBC.x86_64 0:2.3.1-14.el7
Complete!

#安装zabbix前端启用收藏安装源
$ sudo yum install centos-release-scl -y
... ...
Installed:
centos-release-scl.noarch 0:2-3.el7.centos
Dependency Installed:
centos-release-scl-rh.noarch 0:2-3.el7.centos
Complete!

#编辑zabbix前端安装源
$ sudo vim /etc/yum.repos.d/zabbix.repo
...
[zabbix-frontend]
name=Zabbix Official Repository frontend - $basearch
baseurl=http://repo.zabbix.com/zabbix/5.0/rhel/7/$basearch/frontend
enabled=1 #此处修改为1 启用
gpgcheck=1
gpgkey=file:///etc/pki/rpm-gpg/RPM-GPG-KEY-ZABBIX-A14FE591
...
环境依赖包安装
#安装zabbix环境依赖包
$ sudo yum -y install zabbix-web-mysql-scl zabbix-nginx-conf-scl
Loaded plugins: fastestmirror, langpacks
... ...
Installed:
zabbix-nginx-conf-scl.noarch 0:5.0.6-1.el7           zabbix-web-mysql-scl.noarch 0:5.0.6-1.el7
Dependency Installed:
rh-nginx116-nginx.x86_64 1:1.16.1-4.el7.1            rh-nginx116-runtime.x86_64 0:1.16-1.el7
rh-php72.x86_64 0:1-2.el7                            rh-php72-php-bcmath.x86_64 0:7.2.24-1.el7
rh-php72-php-cli.x86_64 0:7.2.24-1.el7               rh-php72-php-common.x86_64 0:7.2.24-1.el7
rh-php72-php-fpm.x86_64 0:7.2.24-1.el7               rh-php72-php-gd.x86_64 0:7.2.24-1.el7
rh-php72-php-json.x86_64 0:7.2.24-1.el7              rh-php72-php-ldap.x86_64 0:7.2.24-1.el7
rh-php72-php-mbstring.x86_64 0:7.2.24-1.el7          rh-php72-php-mysqlnd.x86_64 0:7.2.24-1.el7
rh-php72-php-pdo.x86_64 0:7.2.24-1.el7               rh-php72-php-pear.noarch 1:1.10.5-1.el7
rh-php72-php-process.x86_64 0:7.2.24-1.el7           rh-php72-php-xml.x86_64 0:7.2.24-1.el7
rh-php72-php-zip.x86_64 0:7.2.24-1.el7               rh-php72-runtime.x86_64 0:1-2.el7
zabbix-web.noarch 0:5.0.6-1.el7                      zabbix-web-deps-scl.noarch 0:5.0.6-1.el7
Complete!
MySQL安装配置
#MySQL安装准备
$ sudo vi /etc/yum.repos.d/mysql-community.repo #编辑MySQL安装源
  [mysql57-community]
  name=MySQL 5.7 Community Server
  baseurl=http://repo.mysql.com/yum/mysql-5.7-community/el/7/$basearch/
  enabled=1 #此处改为1,其他版本则改为0
  gpgcheck=0 #此处改为0,不检查gpg-key
  gpgkey=file:///etc/pki/rpm-gpg/RPM-GPG-KEY-mysql
#安装MySQL 5.7
$ sudo yum -y install mysql-community-server
Loaded plugins: fastestmirror, langpacks
... ...
Installed:
  mysql-community-libs.x86_64 0:5.7.32-1.el7        mysql-community-libs-compat.x86_64 0:5.7.32-1.el7
  mysql-community-server.x86_64 0:5.7.32-1.el7
Dependency Installed:
  mysql-community-client.x86_64 0:5.7.32-1.el7         mysql-community-common.x86_64 0:5.7.32-1.el7
Dependency Updated:
  postfix.x86_64 2:2.10.1-9.el7
Replaced:
  mariadb-libs.x86_64 1:5.5.56-2.el7
Complete!
数据库配置
#启动MySQL数据库
$ sudo systemctl start mysqld
#设为开机启动
$ sudo systemctl enable mysqld
#设置MySQL数据库root密码
$ sudo grep 'temporary password' /var/log/mysqld.log  #MySQL安装完成后,默认在/var/log/mysqld.log中会有默认密码
2020-12-07T00:31:45.104451Z 1 [Note] A temporary password is generated for root@localhost: wv,fe76Re:pg
#将密码修改为'passwd1!'提示不满足当前安全策略
  mysql> ALTER USER 'root'@'localhost' IDENTIFIED BY 'passwd1!';
  ERROR 1819 (HY000): Your password does not satisfy the current policy requirements
$sudo vim /etc/my.cnf #修改默认密码策略
[mysqld]
#
# Remove leading # and set to the amount of RAM for the most important data
# cache in MySQL. Start at 70% of total RAM for dedicated server, else 10%.
# innodb_buffer_pool_size = 128M
#
# Remove leading # to turn on a very important data integrity option: logging
# changes to the binary log between backups.
# log_bin
#
# Remove leading # to set options mainly useful for reporting servers.
# The server defaults are faster for transactions and fast SELECTs.
# Adjust sizes as needed, experiment to find the optimal values.
# join_buffer_size = 128M
# sort_buffer_size = 2M
# read_rnd_buffer_size = 2M
datadir=/var/lib/mysql
socket=/var/lib/mysql/mysql.sock
# Disabling symbolic-links is recommended to prevent assorted security risks
symbolic-links=0
log-error=/var/log/mysqld.log
pid-file=/var/run/mysqld/mysqld.pid
validate_password_policy=0 #添加此行
# #Mysql默认的密码策略
  validate_password_policy:密码策略,默认为MEDIUM策略
  validate_password_dictionary_file:密码策略文件,策略为STRONG才需要
  validate_password_length:密码最少长度
  validate_password_mixed_case_count:大小写字符长度,至少1个
  validate_password_number_count :数字至少1个
  validate_password_special_char_count:特殊字符至少1个

#修改密码策略后需重启Mysql服务后,方可修改密码

$ sudo systemctl restart mysqld
$ sudo mysql -uroot -p
 Enter password:
 Welcome to the MySQL monitor.  Commands end with ; or g.
 Your MySQL connection id is 2
 Server version: 5.7.32

 Copyright (c) 2000, 2020, Oracle and/or its affiliates. All rights reserved.

 Oracle is a registered trademark of Oracle Corporation and/or its
 affiliates. Other names may be trademarks of their respective
 owners.

 Type 'help;' or 'h' for help. Type 'c' to clear the current input statement.

 mysql> ALTER USER 'root'@'localhost' IDENTIFIED BY 'passwd1!';
 Query OK, 0 rows affected (0.00 sec)
创建导入Zabbix 数据库架构
#创建zabbix数据库,设置字符集为uft-8
mysql> create database zabbix character set utf8 collate utf8_bin;
#创建zabbix用户,密码为'passwd1!'
mysql> create user zabbix@localhost identified by 'passsd1!';
#允许zabbix访问zabbix*数据库
mysql> grant all privileges on zabbix.* to zabbix@localhost;
mysql> quit;
#导入初始架构和数据,系统将提示您输入新创建zabbix用户的密码
$ sudo zcat /usr/share/doc/zabbix-server-mysql*/create.sql.gz | mysql -uzabbix -p zabbix
Enter password:
为Zabbix server配置数据库
$ sudo vim /etc/zabbix/zabbix_server.conf
#       Database user.
#
# Mandatory: no
# Default:
# DBUser=
DBUser=zabbix
### Option: DBPassword
#       Database password.
#       Comment this line if no password is used.
#
# Mandatory: no
# Default:
DBPassword=passwd1! #修改此行,将zabbix用户数据库密码填上
### Option: DBSocket
#       Path to MySQL socket.
#
# Mandatory: no
# Default:
# DBSocket=
Nginx环境配置
$ sudo vim /etc/opt/rh/rh-nginx116/nginx/conf.d/zabbix.conf
server {
        listen          80; #去掉注释,监听80端口
        server_name     example.com;
        root    /usr/share/zabbix;
        index   index.php;
        location = /favicon.ico {
                log_not_found   off;
        }
        location / {
                try_files       $uri $uri/ =404;
        }
        location /assets {
                access_log      off;
                expires         10d;
        }
        location ~ /.ht {
                deny            all;
        }
        location ~ /(api/|conf[^.]|include|locale) {
                deny            all;
                return          404;
        }
Zabbix 前端配置
$ sudo vim /etc/opt/rh/rh-nginx116/nginx/nginx.conf
... ...
    server {
        listen       8080 default_server; #因zabbix server占用80端口,此处改为8080
        listen       [::]:80 default_server;
        server_name  _;
        root         /opt/rh/rh-nginx116/root/usr/share/nginx/html;
        # Load configuration files for the default server block.
        include      /etc/opt/rh/rh-nginx116/nginx/default.d/*.conf;
        location / {
        }
        error_page 404 /404.html;
......
#为Zabbix前端配置PHP
$ sudo vim /etc/opt/rh/rh-php72/php-fpm.d/zabbix.conf
[zabbix]
user = apache
group = apache
listen = /var/opt/rh/rh-php72/run/php-fpm/zabbix.sock
listen.acl_users = apache,nginx #修改此行,添加nginx用户
listen.allowed_clients = 127.0.0.1
pm = dynamic
pm.max_children = 50
pm.start_servers = 5
pm.min_spare_servers = 5
pm.max_spare_servers = 35
php_value[session.save_handler] = files
php_value[session.save_path]    = /var/opt/rh/rh-php72/lib/php/session/
php_value[max_execution_time] = 300
php_value[memory_limit] = 128M
php_value[post_max_size] = 16M
php_value[upload_max_filesize] = 2M
php_value[max_input_time] = 300
php_value[max_input_vars] = 10000
php_value[date.timezone] = Asia/Shanghai #修改此处时区,改为亚洲/上海
Zabbix服务启动
#启动Zabbix server和agent进程
$ sudo systemctl restart zabbix-server zabbix-agent rh-nginx116-nginx rh-php72-php-fpm
#设为开机启动
$ sudo systemctl enable zabbix-server zabbix-agent rh-nginx116-nginx rh-php72-php-fpm
Created symlink from /etc/systemd/system/multi-user.target.wants/zabbix-server.service to /usr/lib/systemd/system/zabbix-server.service.
Created symlink from /etc/systemd/system/multi-user.target.wants/zabbix-agent.service to /usr/lib/systemd/system/zabbix-agent.service.
Created symlink from /etc/systemd/system/multi-user.target.wants/rh-nginx116-nginx.service to /usr/lib/systemd/system/rh-nginx116-nginx.service.
Created symlink from /etc/systemd/system/multi-user.target.wants/rh-php72-php-fpm.service to /usr/lib/systemd/system/rh-php72-php-fpm.service.
前端安装
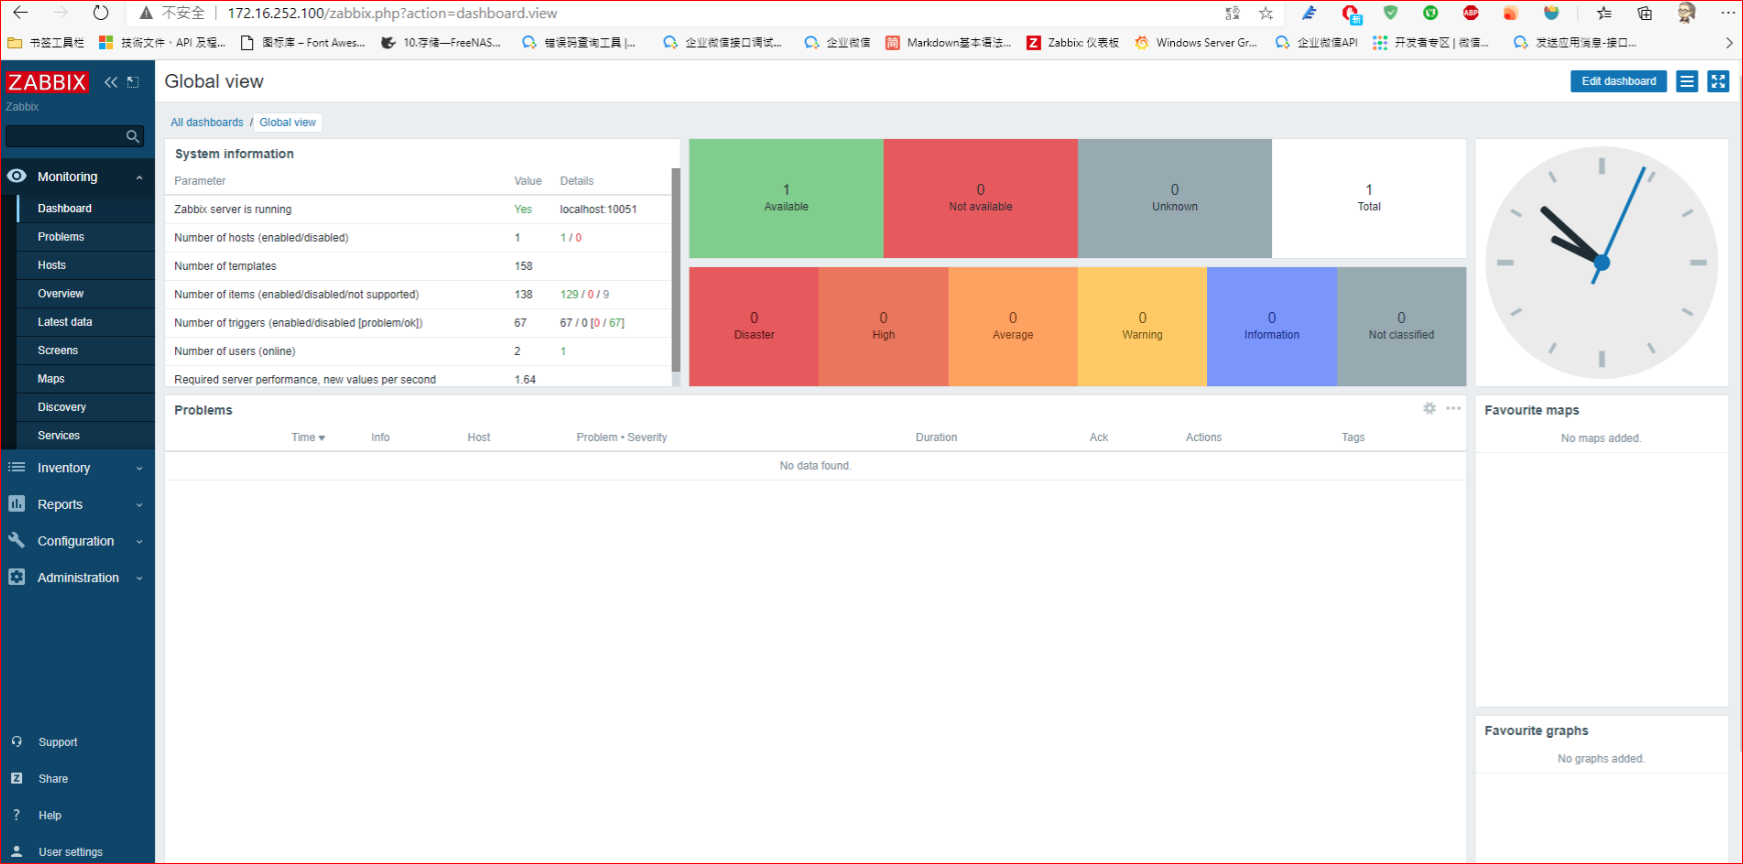
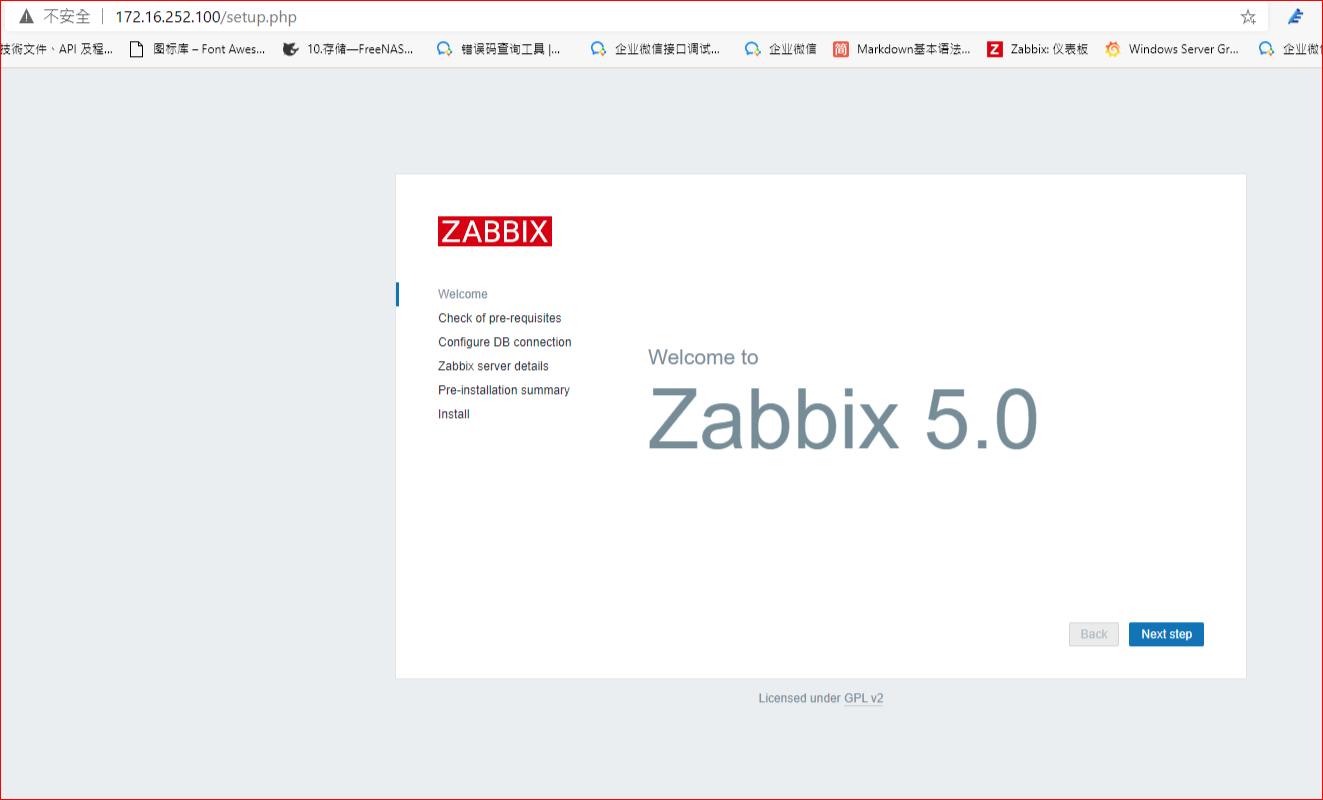
打开浏览器进入http://你的zabbix服务器ip
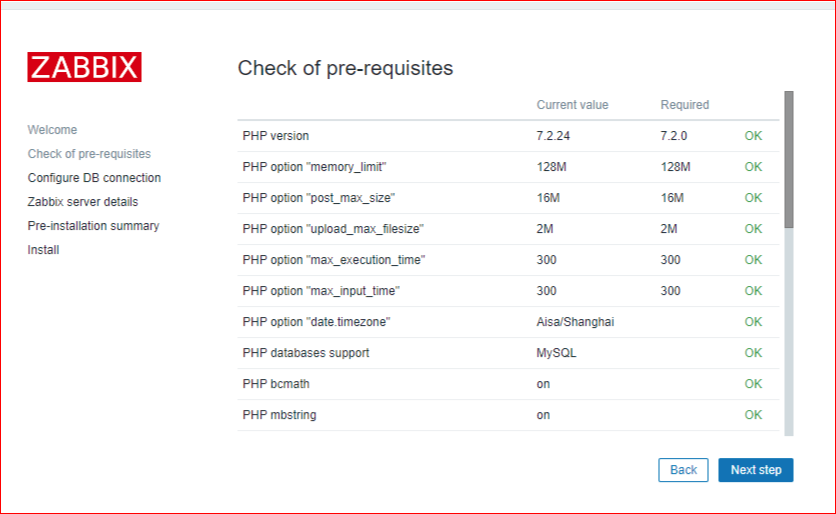
下一步,环境检查,全部ok后,下一步
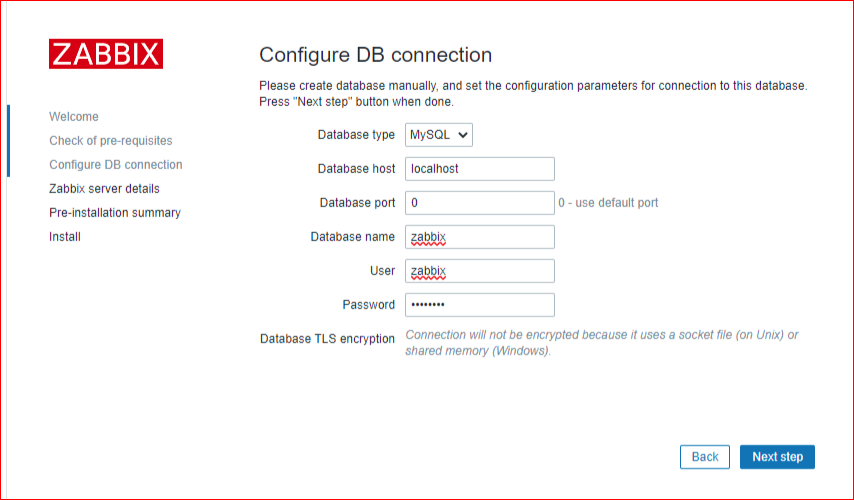
确认数据库配置,输入之前新建的zabbix数据库用户密码,下一步继续安装
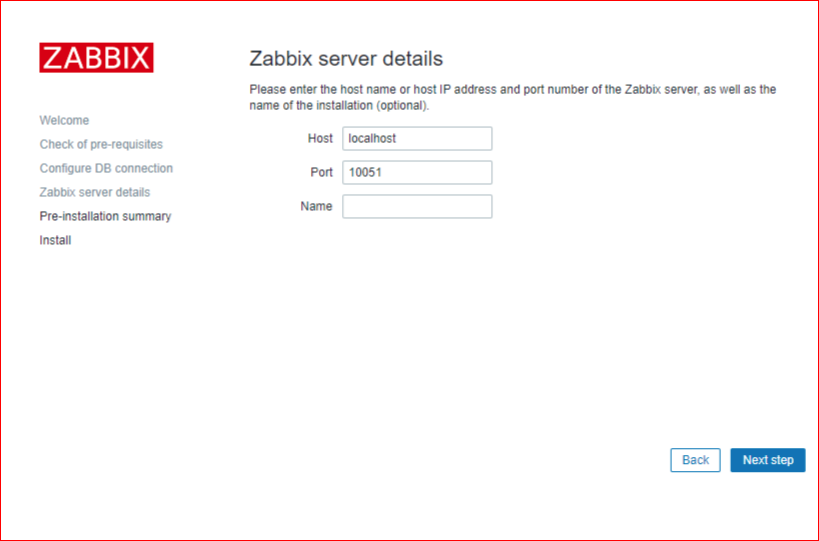
确认Zabbix服务端信息,命名,下一步安装
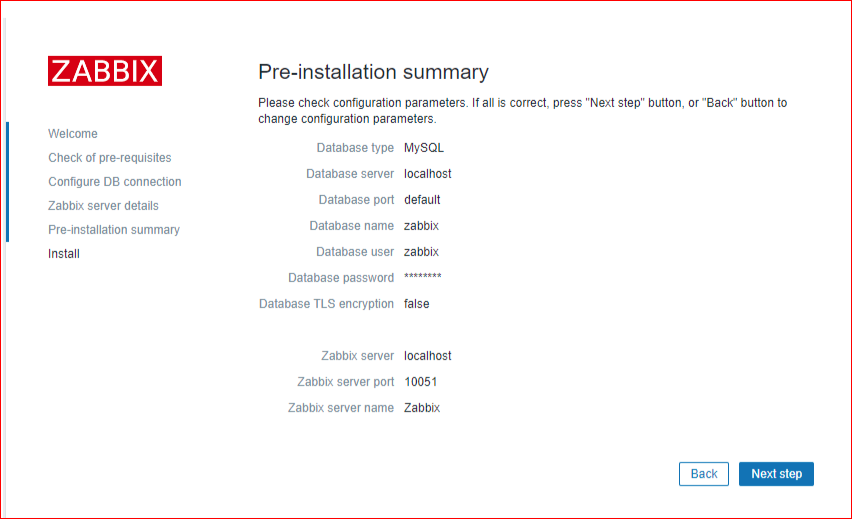
确认配置,下一步继续安装
安装完成

安装完成,使用默认账号Admin密码zabbix登录进入